알파카 모델은 메타에서 공개한 라마 7B 모델을 가져와 Instruction-following 작업을 수행하기 위해 추가적인 훈련(파인튜닝)을 받은 모델입니다.
주의 * Alpaca는 학술 연구만을 목적으로 하며 어떠한 상업적 사용도 금지되어 있음을 강조합니다 . (참고 알파카 블로그)
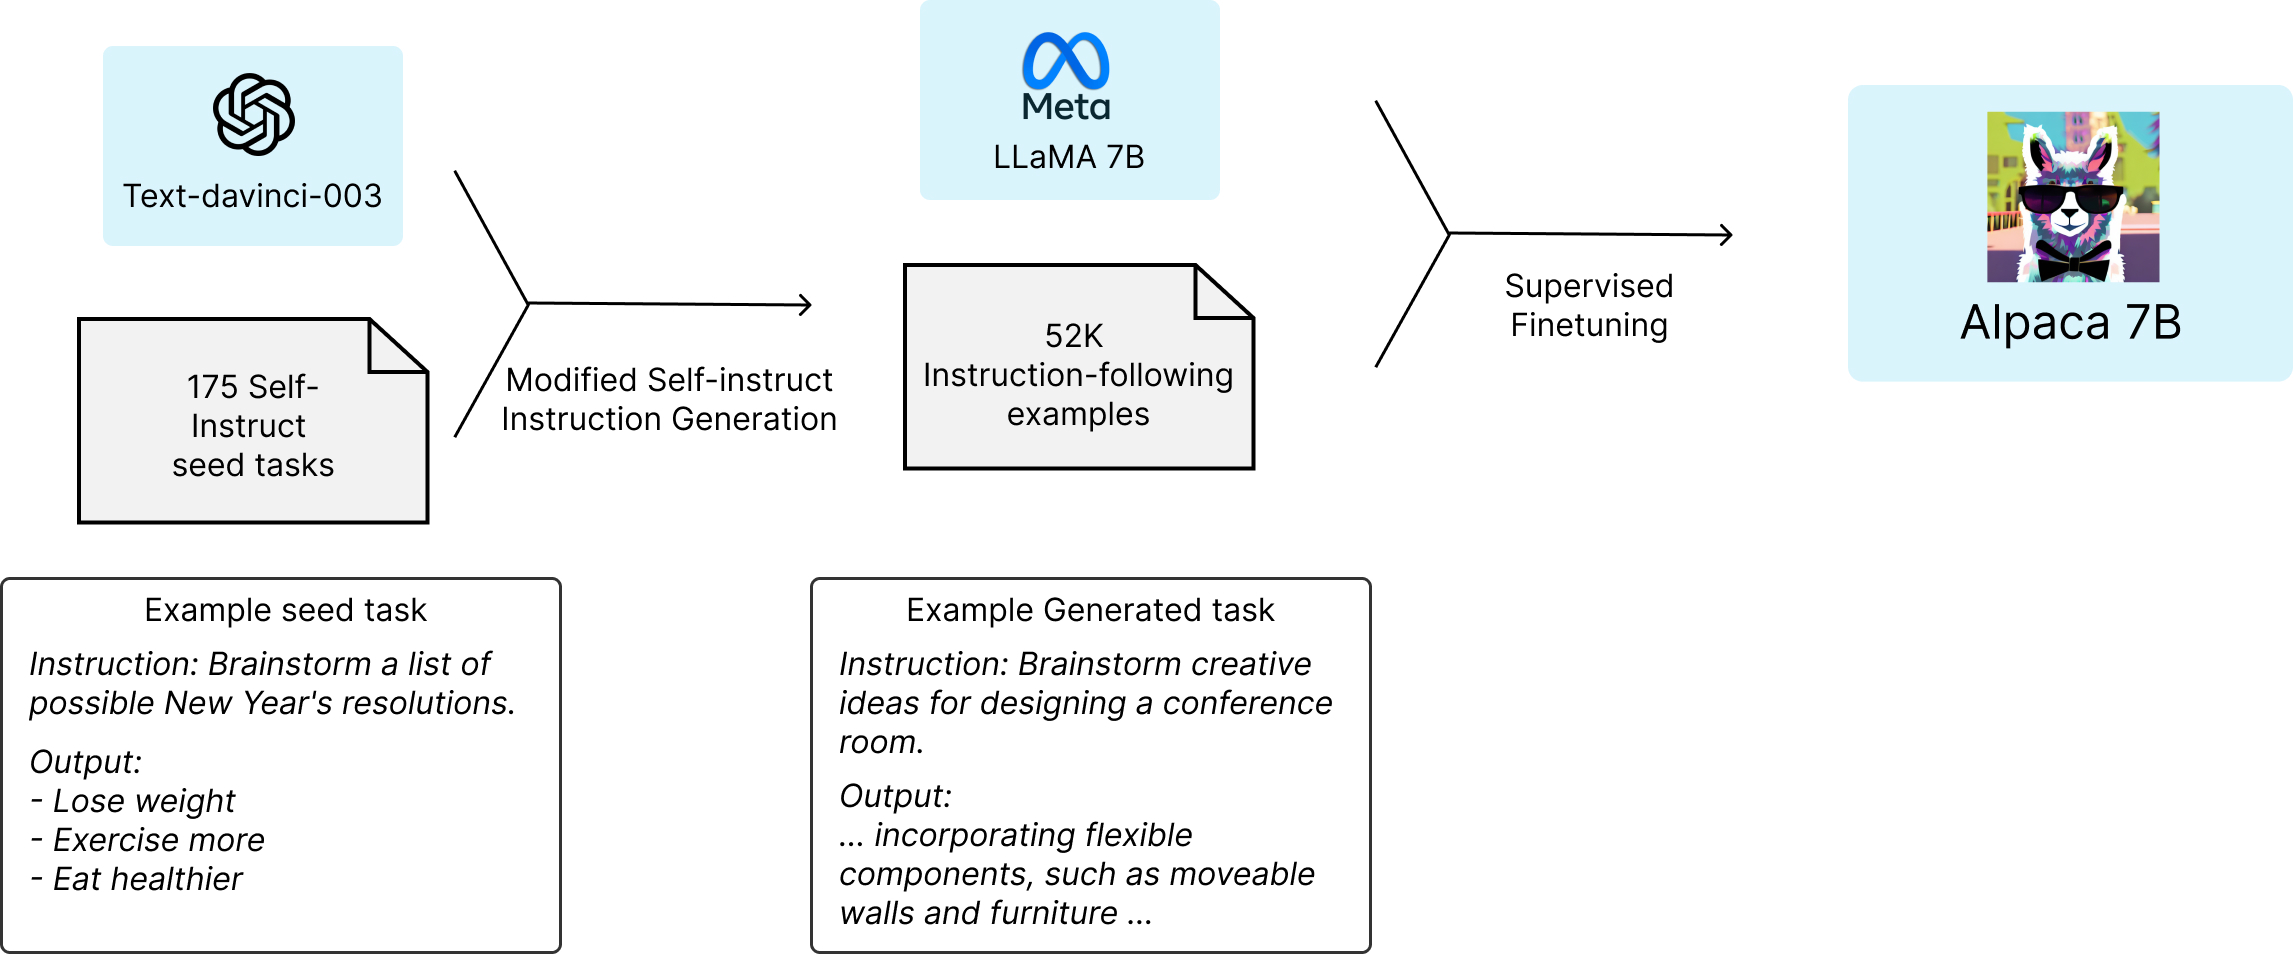
아래 그림은 Alpaca 모델을 얻은 방법을 보여줍니다. 데이터를 위해 우리는 self-instruct seed set 에서 175개의 사람이 작성한 명령-출력 쌍으로 시작했습니다 . (아래 글에도 설명이 나옵니다.) 그런 다음 text-davinci-003에 컨텍스트 내 예제로 시드 세트를 사용하여 추가 지침을 생성하도록 요청했습니다. 생성 파이프라인( GitHub 의 세부 정보 참조)을 단순화하여 자체 지시 방법을 개선 하고 비용을 크게 줄였습니다. 우리의 데이터 생성 프로세스는 52,000개의 고유한 명령과 해당 출력을 생성하며 OpenAI API를 사용하여 $500 미만의 비용이 듭니다.
즉, 다음의 순서입니다.
1.스탠포드 알파카(Alpaca) 코드의 seed_tasks.jsonl 의 175개의 데이터가 있습니다.코드에서 `seed_tasks`는 사전 훈련된 모델을 Fine-tuning하기 위한 초기 데이터로 사용되는 작업의 집합을 나타냅니다.
`seed_tasks`는 사전에 수집된 작업 데이터를 포함하고 있으며, 각 작업은 “시작점” 또는 “초기 상태”로 사용됩니다. 이러한 작업은 사전 훈련된 모델을 특정 작업에 맞게 Fine-tuning하는 데 사용됩니다. 각 작업에는 인간이 작성한 명령문(instruction)과 해당 작업에 대한 입력(input) 및 출력(output) 데이터가 포함될 수 있습니다.
일반적으로 `seed_tasks`는 작은 규모의 초기 데이터셋으로 시작하여 Fine-tuning 과정을 수행합니다. 이러한 초기 데이터는 모델에 필요한 작업에 대한 예시를 제공하고 모델이 해당 작업을 이해하고 수행하는 데 도움을 줍니다. Fine-tuning을 통해 모델은 이러한 초기 데이터에 대한 학습을 거쳐 작업에 더 적합하고 정확한 예측을 수행할 수 있게 됩니다.
따라서 `seed_tasks`는 Fine-tuning 작업에 사용되는 초기 데이터셋을 의미합니다.
2.이것을 아래 그림의 Text-davinci-003을 이용합니다.
3. 그렇게 해서 총 5만2000개를 생성 합니다. 이것을 가지고 아래 그림의 LLaMA 모델을 이용해 미세 조정합니다.초기 실행에서 7B LLaMA 모델을 미세 조정하는 데 8개의 80GB A100에서 3시간이 걸렸으며 대부분의 클라우드 컴퓨팅 공급자에서 100달러 미만입니다. 교육 효율성을 개선하여 비용을 더욱 절감할 수 있습니다.
그렇게 해서 그림 처럼 알파카모델이 탄생되었다는 것입니다.
그럼 이렇게 52000개의 데이터를 만들어 내는 Self -Instruct 과정의 핵심 코드를 보겠습니다. Self -Instruct 는 만약 사람이 52000개의 데이터를 만들어 내려면 얼마나 힘들겠습니까. 그래서 언어모델 자체가 생성한 문장을 학습할 수 있게 하는 것이죠.
그래서 Self Instruct는 스스로(Self) 지시를(Instruct) 언어모델을 통해서 만들어 내는 것입니다.
과정을 안내하는 논문의 그림입니다. 논문의 2페이지에 있습니다.
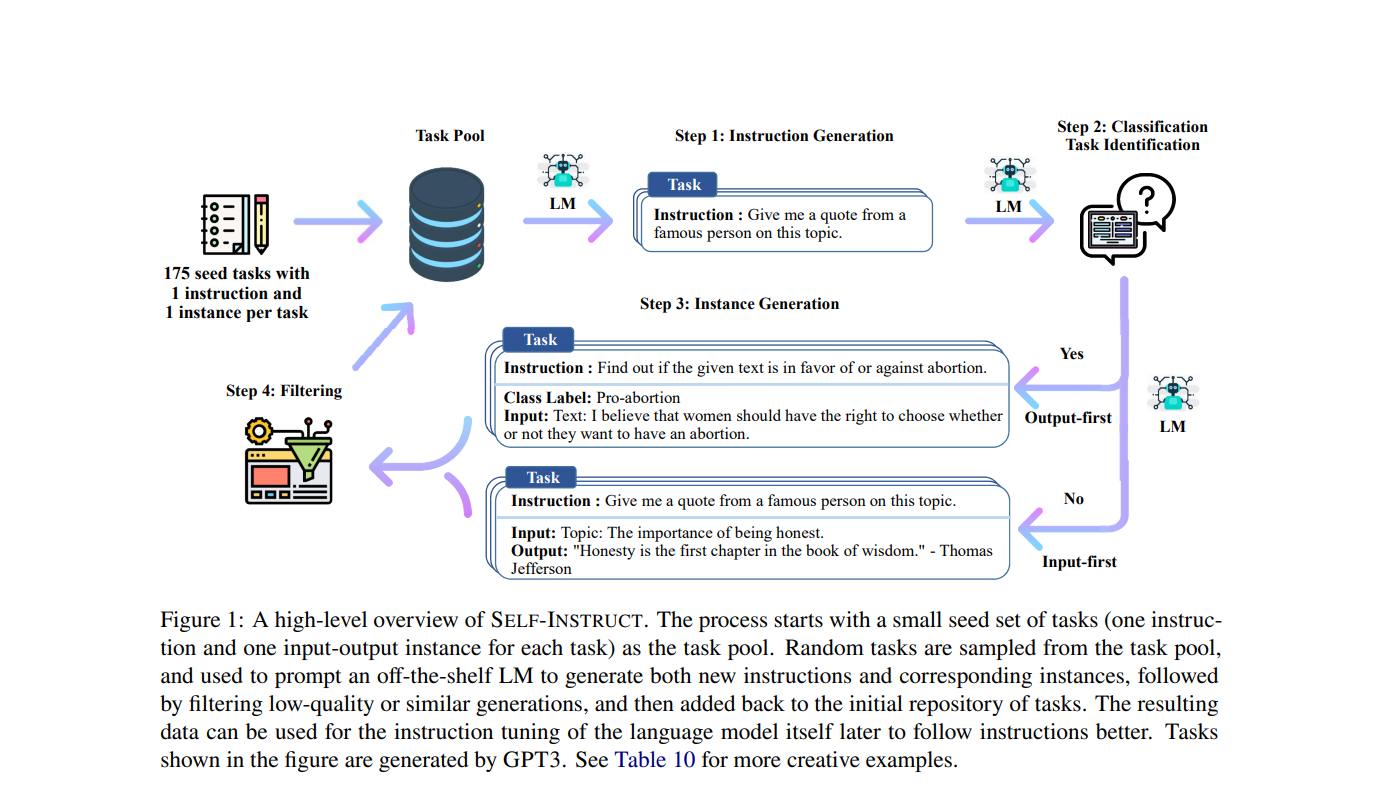
그림 설명입니다. 175개의 seed task입니다. seed_tasks.jsonl 를 보시면 설명처럼 타스크는 각각 하나의 지시와 하나의 인스탄스를 가집니다.(인스탄스는 인풋과 아웃풋을 가지고 있습니다.) 그리고 분류문제인지 여부에 대한 데이터를 가집니다.
이것을 Task Pool에 넣어 LM(언어모델)이 문장을 생성합니다. (Step 1)그리고 분류문제 인지 여부를 판단해 (Step 2) 타스크가 분류가 되는 경우 Class Label 이 있는 타스크, 아니면 그냥 타스크(인스트럭션과 인풋, 아웃풋만 있는)로 나눕니다. (Step 3)
그리고 나서 Step 4에서 필터링을 통해 적절하지 않은 문장을 걸러내도록 합니다.
그리고 나서 다시 필터링된 걸러진 문장을 또다시 Task Pool에 입력해서 위의 과정을 다시 반복합니다. 이렇게 해서 계속해서 Task Pool을 증가 시킬 수 있게 됩니다.
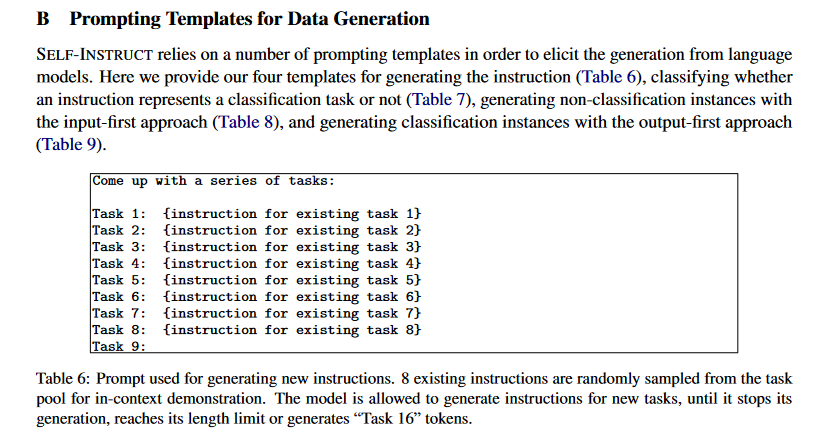
이때 Task Pool을 증가시키는 프롬프트 템플릿에 대한 논문의 내용을 봅니다.
논문 14페이지의 하단을 보세요. Task 9 가 비어 있습니다. 아래 새로운 인스트럭션을 만드는 프롬프트에 의해 새로운 Taks 9 가 만들어 지는것입니다.
그리고 결과물은 다양한 분야를 커버하는 것을 볼 수 있습니다.
https://github.com/shop2world/stanford_alpaca/blob/main/assets/parse_analysis.png
이제 위의 논문을 통해 설명된 Instruction following 을 코드로 구현한 LLaMA model 코드를 봅니다.
이것은 코드의 prompt.txt 와 seed_tasks.josonl 을 이용해서 데이터 생성 구현을 위해 인스트럭션을 생성하는 generate_instruction.py 의 generate_instruction_following_data 함수를 살펴보겠습니다.
이 코드는 generate_instruction_following_data라는 함수를 정의하는 부분입니다. 함수는 다양한 매개변수를 받아들이고, 주어진 매개변수에 따라 작업을 수행하여 지시를 따르는 데이터를 생성합니다.
이 함수의 매개변수는 다음과 같습니다:
output_dir: 생성된 데이터를 저장할 디렉토리 경로입니다. 기본값은 현재 디렉토리("./")입니다.seed_tasks_path: 시드(seed) 지시사항 작업이 포함된 JSONL 파일의 경로입니다. 기본값은./seed_tasks.jsonl입니다.num_instructions_to_generate: 생성할 지시사항의 개수입니다. 기본값은 100입니다.model_name: 사용할 GPT-3.5 모델의 이름입니다. 기본값은"text-davinci-003"입니다.num_prompt_instructions: 각 생성 요청에 포함할 프롬프트(prompt) 지시사항의 개수입니다. 기본값은 3입니다.request_batch_size: 병렬로 수행할 요청의 개수입니다. 기본값은 5입니다.temperature: 모델 출력의 무작위성을 조절하는 온도 매개변수입니다. 기본값은 1.0입니다.top_p: 다양한 출력을 생성하기 위한 top-p(nucleus) 샘플링 매개변수입니다. 기본값은 1.0으로, 모든 가능성을 고려합니다.num_cpus: 병렬화에 사용할 CPU 코어의 개수입니다. 기본값은 16입니다.
함수는 다음과 같은 단계로 진행됩니다:
1 먼저, 위에 그림에서 설명한 seed_tasks 데이터를 가져옵니다.
seed_tasks = [json.loads(l) for l in open(seed_tasks_path, “r”)]
이 코드는 seed_tasks_path로 지정된 JSONL 파일을 열어서 데이터를 로드합니다.
2 seed_tasks 데이터에서 관련 정보를 추출합니다. 그리고 seed_instruction_data 변수에 매핑된 seed_tasks데이터를 넣어 줍니다. (123 번째 줄)
seed_instruction_data = [
        {"instruction": t["instruction"], "input": t["instances"][0]["input"], "output": t["instances"][0]["output"]}
        for t in seed_tasks
    ]
이 코드는 seed_tasks 데이터에서 지시(instruction), 입력(input), 출력(output) 정보를 추출하여 seed_instruction_data에 저장합니다. 아래 그림의 1 instruction , 그리고 1 instance (입력, 출력) 입니다.
3 로드된 인간이 작성한 시드 지시사항의 개수를 출력합니다.
print(f”Loaded {len(seed_instruction_data)} human-written seed instructions”)
4 지시문이 생성될 출력 디렉토리를 생성합니다.
os.makedirs(output_dir, exist_ok=True)
5 요청을 생성하기 위한 인덱스를 초기화합니다.
request_idx = 0
6 기계 생성 지시사항(machine_instruction_data)을 로드합니다.
machine_instruction_data = []
    if os.path.exists(os.path.join(output_dir, "regen.json")):
        machine_instruction_data = utils.jload(os.path.join(output_dir, "regen.json"))
        print(f"Loaded {len(machine_instruction_data)} machine-generated instructions")
이 코드는 기계 생성 지시사항(machine_instruction_data)이 이미 생성되어 있는 경우 해당 파일을 로드합니다. regen.json은 처음에는 존재하지 않지만 나중에 생성되는 파일이 되는 것이죠. 즉, 기계 생성 지시사항(machine_instruction_data)이 있으면 가져오고 없으면 안가져옵니다.
7 Rouge 스코어링을 위한 스코어러 객체를 생성합니다. 생성한 문장의 유사도를 체크합니다.
scorer = rouge_scorer.RougeScorer([“rougeL”], use_stemmer=False)
8 새로운 지시사항을 생성합니다. 위의 num_instructions_to_generate 기본값이 100이므로 100개를 만듭니다.
while len(machine_instruction_data) < num_instructions_to_generate:
request_idx += 1
# 요청 생성과 결과 처리 과정
이 코드는 num_instructions_to_generate로 지정된 개수만큼 지시사항을 생성하는 반복문입니다. 요청 생성 및 결과 처리 과정은 반복문 내에서 수행됩니다.
이후에는 요청 생성 및 결과 처리, 유사도 계산, 생성된 지시사항 관리 등의 과정이 이어집니다.
이쯤에서 지시사항 생성을 위한 함수 generate_instruction_following_data 이 거치는 과정을 봅니다:
seed_tasks.jsonl파일로부터 seed instruction 데이터를 가져옵니다. 이 데이터는 인간이 작성한 지시사항과 해당 지시사항에 대한 입력과 출력으로 구성되어 있습니다.- 지시사항 생성을 위해 LM(Language Model)이 생성한 지시사항 데이터를 불러옵니다. 이 데이터는 이전에 생성된 기계 생성 지시사항으로 구성되어 있습니다. 만약
output_dir경로에 “regen.json” 파일이 존재한다면 해당 파일에서 기계 생성 지시사항 데이터를 로드합니다. - Rouge 스코어 계산을 위해 RougeScorer 객체를 생성합니다.
- 새로운 지시사항을 생성하기 위해 반복문을 실행합니다. 기계 생성 지시사항 데이터의 수가
num_instructions_to_generate보다 작은 경우에만 반복문이 실행됩니다. request_batch_size만큼의 요청(batch)을 생성합니다. 각 요청은num_prompt_instructions개수만큼의 seed instruction 데이터를 사용하여 인코딩된 프롬프트로 구성됩니다.- 생성된 요청을 LM에 전달하여 지시사항을 생성합니다. 이때 LM 모델 이름, 온도(temperature), 상위 p(top_p) 등의 매개변수를 설정하여 생성 방식을 조정할 수 있습니다.
- 생성된 결과를 후처리하여 새로운 지시사항 데이터를 추출합니다.
- 추출된 새로운 지시사항 데이터와 기존의 지시사항 데이터를 비교하여 유사도를 계산합니다. 이를 위해 Rouge 스코어를 사용합니다. 계산된 유사도는 가장 유사한 지시사항들과 함께 저장됩니다.
- 유사도가 일정 기준(0.7)을 넘지 않는 지시사항은 유지하고, 유사도가 높은 지시사항은 새로운 기계 생성 지시사항 데이터에 추가합니다.
- 생성된 지시사항의 수와 유지된 지시사항의 수를 출력합니다.
- 기계 생성 지시사항 데이터를 파일에 저장합니다.
이러한 과정을 거쳐서 새로운 기계 생성 지시사항 데이터가 생성됩니다.
또 이어서 보겠습니다.
145번째 줄 코드를 보겠습니다.
# first we tokenize all the seed instructions and generated machine instructions
    all_instructions = [d["instruction"] for d in seed_instruction_data] + [
        d["instruction"] for d in machine_instruction_data
    ]
    all_instruction_tokens = [scorer._tokenizer.tokenize(inst) for inst in all_instructions]
위 코드는 seed instruction과 기계 생성된 지시사항(machine_instruction_data)들을 토큰화하는 과정입니다. 둘이 더해진 변수 all_instructions 는 아래 그림의 Task Pool에 해당됩니다.
먼저, seed_instruction_data에서 seed instruction들의 텍스트 부분만 추출하여 all_instructions 리스트에 저장합니다. 이때, seed_instruction_data는 seed instruction 데이터의 리스트이며, 각각의 데이터는 다음과 같은 구조를 가지고 있습니다:
{
“instruction”: <지시사항 텍스트>,
“input”: <입력 데이터>,
“output”: <출력 데이터>
}
다음으로, machine_instruction_data에서 기계 생성된 지시사항들의 텍스트 부분을 추출하여 all_instructions 리스트에 추가합니다. 이렇게 되면 all_instructions 리스트에는 seed instruction과 기계 생성된 지시사항들의 모든 텍스트가 포함됩니다.
그 후, all_instruction_tokens 리스트를 생성합니다. 이 리스트는 각각의 지시사항 텍스트를 토큰화한 결과를 담고 있습니다. scorer._tokenizer.tokenize(inst) 코드는 주어진 지시사항 텍스트 inst를 토큰화하여 리스트 형태로 반환합니다. 따라서 all_instruction_tokens 리스트는 all_instructions 리스트에 있는 모든 지시사항들을 토큰화한 결과로 구성됩니다.
이렇게 함으로써, seed instruction과 기계 생성된 지시사항들을 모두 토큰화하여 나중에 유사도를 계산하는 데 사용할 수 있게 됩니다.
토큰화된 데이터는 리스트의 리스트 형태로 구성됩니다. 각각의 리스트는 해당 지시사항의 토큰으로 구성되어 있습니다. 예를 들어, all_instruction_tokens 리스트의 한 요소를 살펴보면 다음과 같은 형태일 수 있습니다:
[
['First', 'prompt', 'instruction', '.'],
['Second', 'prompt', 'instruction', 'with', 'more', 'tokens', '.'],
# ...
]
위 예시에서는 두 개의 지시사항이 토큰화되어 있습니다. 각각의 지시사항은 해당 지시사항을 구성하는 단어들로 토큰화되어 리스트 형태로 저장되어 있습니다. 이러한 토큰화된 데이터를 활용하여 지시사항들 간의 유사도를 계산하거나 기타 자연어처리 작업을 수행할 수 있습니다.
154번째 코드를 보겠습니다.
batch_inputs = []
        for _ in range(request_batch_size):
            # only sampling from the seed tasks 시드에서만 샘플링!
            prompt_instructions = random.sample(seed_instruction_data, num_prompt_instructions)
            prompt = encode_prompt(prompt_instructions)
            batch_inputs.append(prompt)
request_batch_size가 5로 설정되어 있기 때문에 5개의 프롬프트가 생성됩니다.
request_batch_size는 한 번의 요청(batch)에 포함될 입력 데이터의 개수를 나타내는 변수입니다. 즉, 한 번의 요청에 동시에 처리할 프롬프트의 개수를 지정하는 값입니다. 위 코드에서는 request_batch_size가 5로 설정되어 있으므로, 각 반복마다 5개의 프롬프트가 생성되고 batch_inputs 리스트에 추가됩니다.
일반적으로 request_batch_size 값을 설정하는 것은 처리 효율성과 성능을 조절하는 데에 도움이 됩니다. 한 번에 여러 개의 입력 데이터를 처리하면 처리 시간을 단축시킬 수 있으며, LM이 병렬로 작업을 수행하여 전체 처리량을 높일 수 있습니다. 하지만 더 많은 메모리 및 처리 자원이 필요하므로 적절한 값으로 조정해야 합니다.
따라서 위 코드는 `request_batch_size`에 지정된 개수인 5개의 프롬프트를 생성하는 과정입니다.
먼저, 빈 리스트인 `batch_inputs`가 초기화됩니다. 이 리스트는 생성된 프롬프트를 저장하기 위한 용도로 사용됩니다.
다음으로, `request_batch_size`에 지정된 개수만큼 반복문이 실행됩니다. 이 반복문은 요청의 개수에 따라서 5번 실행됩니다.
각 반복에서는 `seed_instruction_data`에서 `num_prompt_instructions` 개수만큼의 seed instruction 데이터를 무작위로 선택합니다. 이때, `random.sample()` 함수를 사용하여 중복 없이 랜덤하게 선택됩니다. 선택된 seed instruction 데이터는 `prompt_instructions` 변수에 저장됩니다.
그 다음, `prompt_instructions`를 이용하여 `encode_prompt()` 함수가 호출되어 프롬프트를 인코딩합니다. 이 함수는 선택된 seed instruction 데이터를 기반으로 프롬프트를 생성하고, 인코딩된 형태로 반환합니다. 이렇게 생성된 프롬프트는 `prompt` 변수에 저장됩니다. 즉, 그림에서 LM에서 프롬프트를 입력해 지시를 하는 부분이죠.
마지막으로, 생성된 프롬프트(`prompt`)를 `batch_inputs` 리스트에 추가합니다. 이렇게 되면 각 반복에서 생성된 프롬프트가 `batch_inputs` 리스트에 저장되어 총 5개의 프롬프트가 저장됩니다.
따라서, 위 코드는 `request_batch_size`에 지정된 개수인 5개의 프롬프트를 생성하여 `batch_inputs` 리스트에 저장하는 과정을 수행합니다. 이후에 `batch_inputs` 리스트에 저장된 프롬프트를 이용하여 LM(Language Model)에게 한 번에 여러 개의 요청을 전달할 수 있습니다.
이제 27번째 줄의 prompt_instructions 보겠습니다. 그림의 Task 9 프롬프트를 생성하게 되는데요, 코드를 설명해 봅니다.
def encode_prompt(prompt_instructions):
    """Encode multiple prompt instructions into a single string."""
    prompt = open("./prompt.txt").read() + "\n"

    for idx, task_dict in enumerate(prompt_instructions):
        (instruction, input, output) = task_dict["instruction"], task_dict["input"], task_dict["output"]
        instruction = re.sub(r"\s+", " ", instruction).strip().rstrip(":")
        input = "" if input.lower() == "" else input
        prompt += f"###\n"
        prompt += f"{idx + 1}. Instruction: {instruction}\n"
        prompt += f"{idx + 1}. Input:\n{input}\n"
        prompt += f"{idx + 1}. Output:\n{output}\n"
    prompt += f"###\n"
    prompt += f"{idx + 2}. Instruction:"
    return prompt
해당 코드는 `encode_prompt`라는 함수를 정의하고 있습니다. 이 함수는 여러 개의 프롬프트 명령어를 하나의 문자열로 인코딩하는 역할을 합니다.
함수 내부에서는 주어진 `prompt_instructions`라는 인자를 순회하면서 각각의 명령어를 처리합니다. 각 명령어는 “instruction” (명령어), “input” (입력), “output” (출력)의 세 가지 정보를 가지고 있는 사전 형태로 주어집니다.
코드의 실행 흐름은 다음과 같습니다:
1. `prompt` 변수에 “./prompt.txt” 파일의 내용을 읽어와 저장합니다.
2. `prompt` 문자열 끝에 줄 바꿈 문자를 추가합니다.
3. `prompt_instructions`를 순회하면서 각각의 명령어를 처리합니다.
4. 명령어의 “instruction”, “input”, “output” 값을 가져옵니다.
5. “instruction” 문자열에서 연속된 공백을 하나로 치환하고 양쪽 공백을 제거한 후 마지막의 콜론을 제거합니다.
6. “input” 값이 빈 문자열인 경우 빈 문자열로 유지하고, 그렇지 않은 경우에는 소문자로 변환합니다.
7. `prompt` 문자열에 명령어 정보를 추가합니다. 각 명령어는 “###”로 구분되며, “Instruction:”, “Input:”, “Output:”과 함께 해당 값을 출력합니다.
8. `prompt` 문자열에 모든 명령어 정보를 추가한 후, 마지막에 추가적인 “Instruction:” 문장을 추가합니다.
9. 최종적으로 구성된 `prompt` 문자열을 반환합니다.
이 함수를 사용하여 여러 개의 프롬프트 명령어를 하나의 문자열로 인코딩하고자 할 때, `encode_prompt` 함수를 호출하면 됩니다.
이제 배치 처리 작업으로 openai에 데이터 처리하는 부분을 보겠습니다. 154줄입니다.
batch_inputs = []
        for _ in range(request_batch_size):
            # only sampling from the seed tasks
            prompt_instructions = random.sample(seed_instruction_data, num_prompt_instructions)
            prompt = encode_prompt(prompt_instructions)
            batch_inputs.append(prompt)
        decoding_args = utils.OpenAIDecodingArguments(
            temperature=temperature,
            n=1,
            max_tokens=3072,  # hard-code to maximize the length. the requests will be automatically adjusted
            top_p=top_p,
            stop=["\n20", "20.", "20."],
        )
해당 코드는 데이터를 배치로 처리하기 위한 과정을 나타내고 있습니다. 주어진 코드는 다음과 같은 기능을 수행합니다:
1. `batch_inputs`라는 빈 리스트를 생성합니다. 이 리스트는 인코딩된 프롬프트를 저장할 용도로 사용됩니다.
2. `request_batch_size` 변수에 지정된 값만큼 반복문을 실행합니다.
3. `seed_instruction_data`에서 `num_prompt_instructions`개의 명령어를 랜덤하게 추출하여 `prompt_instructions`에 저장합니다. 이는 프롬프트에서 사용할 명령어를 샘플링하는 과정입니다.
4. `encode_prompt` 함수를 사용하여 `prompt_instructions`을 하나의 문자열로 인코딩합니다. 인코딩된 프롬프트는 `prompt`에 저장됩니다.
5. `batch_inputs` 리스트에 `prompt`을 추가합니다.
6. `utils.OpenAIDecodingArguments`를 사용하여 디코딩 인자를 설정합니다. 이 인자는 디코딩 과정에서 사용될 설정값들을 담고 있습니다. 여기서는 온도(temperature), 생성할 토큰의 개수(n), 최대 토큰 수(max_tokens), 상위 확률(top_p), 중지 조건(stop) 등이 설정되었습니다.
이 코드는 배치로 처리할 데이터를 생성하는 과정을 보여주고 있습니다. `request_batch_size`만큼의 데이터를 처리하여 인코딩된 프롬프트를 `batch_inputs` 리스트에 추가하고, 디코딩 과정에서 사용될 인자를 설정합니다. 이후 이러한 데이터와 설정을 이용하여 모델의 디코딩을 수행할 수 있습니다.
이제 결과를 반환하는 부분을 봅니다.168번째 줄입니다.
results = utils.openai_completion(
            prompts=batch_inputs,
            model_name=model_name,
            batch_size=request_batch_size,
            decoding_args=decoding_args,
            logit_bias={"50256": -100},  # prevent the <|endoftext|> token from being generated
        )
해당 코드는 OpenAI의 언어 모델에 대한 요청을 처리하고 결과를 반환하는 부분입니다.
– `utils.openai_completion`: 이 함수는 OpenAI 언어 모델에 대한 완성(completion) 요청을 보냅니다. 이 함수는 다양한 매개변수를 사용하여 요청을 구성하고, 모델에 대한 완성 결과를 반환합니다.
– `prompts`: `batch_inputs`는 언어 모델에 제공되는 입력 프롬프트입니다. `batch_inputs`는 여러 개의 프롬프트로 구성된 리스트입니다.
– `model_name`: 이 매개변수는 사용할 OpenAI 모델의 이름을 지정합니다. 해당 코드에서는 `model_name`에 지정된 모델을 사용하여 완성 요청을 처리합니다.
– `batch_size`: 배치의 크기를 지정합니다. 이 값은 한 번에 처리할 프롬프트의 수를 결정합니다.
– `decoding_args`: 이 매개변수는 디코딩(decoding) 옵션을 설정합니다. 디코딩 옵션은 완성 결과를 생성할 때 사용되는 다양한 설정값들을 포함합니다. 예를 들어, 온도(temperature), 최대 토큰 개수(max_tokens), top-p 값 등이 설정될 수 있습니다.
– `logit_bias`: 이 매개변수는 로짓 편향(logit bias)을 설정합니다. 로짓 편향은 특정 토큰이 생성되는 확률을 조정하기 위해 사용될 수 있습니다. 해당 코드에서는 “50256”이라는 토큰의 생성을 방지하기 위해 로짓 편향이 설정되었습니다.
`results` 변수에는 OpenAI 언어 모델로부터 반환된 완성 결과가 저장됩니다. 이 결과를 통해 모델이 생성한 텍스트를 확인하고, 이후의 처리나 분석에 활용할 수 있습니다.
이렇게 반환된 results 를 후처리 하는 부분을 봅니다. 178번째 줄입니다.
instruction_data = []
        for result in results:
            new_instructions = post_process_gpt3_response(num_prompt_instructions, result)
            instruction_data += new_instructions
해당 코드는 언어 모델의 완성 결과를 처리하고, 처리된 결과를 `instruction_data` 리스트에 추가하는 부분입니다.
– `results`: `results`는 언어 모델의 완성 결과를 담고 있는 리스트입니다. 이전 단계에서 언어 모델에 대한 완성 요청이 보내졌고, 이 코드에서는 해당 요청에 대한 결과를 처리합니다.
– `for result in results:`: `results` 리스트의 각각의 결과에 대해 반복문을 실행합니다. 이 코드는 결과 리스트의 모든 요소를 하나씩 처리합니다.
– `new_instructions = post_process_gpt3_response(num_prompt_instructions, result)`: 생성된 문장을 하나 하나 가져와서 `post_process_gpt3_response` 함수를 사용하여 결과를 후처리합니다. 이 함수는 완성된 텍스트 결과를 입력 프롬프트와 관련된 지시사항으로 변환합니다. `num_prompt_instructions` 매개변수는 변환할 지시사항의 개수를 나타냅니다.
– `instruction_data += new_instructions`: 후처리된 지시사항을 `instruction_data` 리스트에 추가합니다. `+=` 연산자는 리스트에 다른 리스트를 추가하는 역할을 합니다.
결과적으로, 이 코드는 언어 모델의 완성 결과를 처리하고, 처리된 결과를 `instruction_data` 리스트에 모아서 저장합니다. 이후의 처리나 분석을 위해 `instruction_data` 리스트를 활용할 수 있습니다.
위의 후처리 하는 post_process_gpt3_response 부분의 코드를 살펴 보겠습니다.
def post_process_gpt3_response(num_prompt_instructions, response):
    if response is None:
        return []
    raw_instructions = f"{num_prompt_instructions+1}. Instruction:" + response["text"]
    raw_instructions = re.split("###", raw_instructions)
    instructions = []
    for idx, inst in enumerate(raw_instructions):
        # if the decoding stops due to length, the last example is likely truncated so we discard it
        if idx == len(raw_instructions) - 1 and response["finish_reason"] == "length":
            continue
        idx += num_prompt_instructions + 1
        splitted_data = re.split(f"{idx}\.\s+(Instruction|Input|Output):", inst)
        if len(splitted_data) != 7:
            continue
        else:
            inst = splitted_data[2].strip()
            input = splitted_data[4].strip()
            input = "" if input.lower() == "" else input
            output = splitted_data[6].strip()
        # filter out too short or too long instructions
        if len(inst.split()) <= 3 or len(inst.split()) > 150:
            continue
        # filter based on keywords that are not suitable for language models.
        blacklist = [
            "image",
            "images",
            "graph",
            "graphs",
            "picture",
            "pictures",
            "file",
            "files",
            "map",
            "maps",
            "draw",
            "plot",
            "go to",
            "video",
            "audio",
            "music",
            "flowchart",
            "diagram",
        ]
        blacklist += []
        if any(find_word_in_string(word, inst) for word in blacklist):
            continue
        # We found that the model tends to add "write a program" to some existing instructions, which lead to a lot of such instructions.
        # And it's a bit comfusing whether the model need to write a program or directly output the result.
        # Here we filter them out.
        # Note this is not a comprehensive filtering for all programming instructions.
        if inst.startswith("Write a program"):
            continue
        # filter those starting with punctuation
        if inst[0] in string.punctuation:
            continue
        # filter those starting with non-english character
        if not inst[0].isascii():
            continue
        instructions.append({"instruction": inst, "input": input, "output": output})
    return instructions
위의 코드는 `post_process_gpt3_response`라는 함수를 정의하는 부분입니다. 이 함수는 GPT-3 모델의 응답을 후처리하여 유효한 지시사항들을 추출하는 역할을 합니다.
함수의 동작은 다음과 같습니다:
1. 먼저, 응답이 `None`인 경우 빈 리스트를 반환합니다.
2. `raw_instructions` 변수에는 응답 텍스트와 숫자를 조합한 문자열이 저장됩니다. 이 문자열은 `###`로 구분된 여러 개의 지시사항으로 이루어져 있습니다.
3. `raw_instructions`를 `###`를 기준으로 분할하여 개별 지시사항들을 추출합니다.
4. `instructions` 리스트를 초기화합니다.
5. `raw_instructions`의 각 지시사항을 순회하면서 다음 작업을 수행합니다:
– 지시사항의 인덱스(`idx`)가 마지막 지시사항이면서 디코딩이 길이로 인해 중단된 경우, 해당 지시사항을 건너뜁니다.
– `idx`에 `num_prompt_instructions` 값을 더해 해당 지시사항의 인덱스를 계산합니다.
– 정규식을 사용하여 지시사항을 “Instruction”, “Input”, “Output”으로 분할합니다.
– 분할된 데이터가 예상한 형식(7개의 요소)이 아닌 경우 건너뜁니다.
– 분할된 데이터에서 지시사항, 입력 및 출력을 추출합니다. 입력이 `<noinput>`인 경우 빈 문자열로 처리합니다.
– 지시사항의 단어 수가 3 미만이거나 150을 초과하는 경우 건너뜁니다.
– 언어 모델에 적합하지 않은 키워드를 포함하는지 확인합니다. 이때, `blacklist`에 지정된 키워드들을 사용하여 필터링합니다.예를 들어, “image”, “graph”, “file”, “draw” 등의 단어는 언어 모델에 직접적인 의미를 갖지 않으며, 이미지, 그래프, 파일 작성 또는 그리기와 관련된 작업을 의미하는 경우가 많습니다. 이러한 키워드를 포함하는 지시사항은 언어 모델의 목적과는 부합하지 않기 때문에 걸러내는 것이 좋습니다.따라서 해당 코드는 언어 모델이 생성하는 지시사항 중에서 “blacklist”에 지정된 키워드를 가진 것들을 제외하여 유효한 지시사항들만을 추출하는 역할을 합니다. 이를 통해 언어 모델의 결과를 보다 적절하고 유용하게 만들어 줍니다.
– “Write a program”으로 시작하는 지시사항은 건너뜁니다.if inst.startswith(“Write a program”):
– 구두점으로 시작하는 지시사항은 건너뜁니다.if inst[0] in string.punctuation:
– 영어가 아닌 문자로 시작하는 지시사항은 건너뜁니다.
– 이렇게 해서 정제된 유효한 지시사항으로 판단되면 `instructions` 리스트에 추가합니다.
6. 최종적으로 추출된 유효한 지시사항들이 담긴 `instructions` 리스트를 반환합니다.
그림의 Step4:Filtering에 해당되는 부분입니다.
이 함수는 GPT-3 모델의 응답을 처리하여 유효한 지시사항들을 추출하고, 특정 조건에 맞지 않는 지시사항들을 걸러내는 등의 후처리 과정을 수행합니다. 이를 통해 보다 정확하고 유용한 결과를 얻을 수 있습니다. 추출된 유효한 지시사항들은 원하는 형식과 요구사항에 맞게 정제되어 있으며, 불필요한 지시사항이나 제한된 키워드가 제거되어 있습니다. 이를 통해 후속 작업에서 필요한 목적에 맞는 지시사항들을 활용할 수 있습니다.
이제 후처리된 데이터를 가지고 처리하는 부분을 살펴보겠습니다. 278번째 줄입니다.
instruction_data = []
        for result in results:
            new_instructions = post_process_gpt3_response(num_prompt_instructions, result)
            instruction_data += new_instructions

        total = len(instruction_data)
        keep = 0
        for instruction_data_entry in instruction_data:
            # computing similarity with the pre-tokenzied instructions
            new_instruction_tokens = scorer._tokenizer.tokenize(instruction_data_entry["instruction"])
            with Pool(num_cpus) as p:
                rouge_scores = p.map(
                    partial(rouge_scorer._score_lcs, new_instruction_tokens),
                    all_instruction_tokens,
                )
            rouge_scores = [score.fmeasure for score in rouge_scores]
            most_similar_instructions = {
                all_instructions[i]: rouge_scores[i] for i in np.argsort(rouge_scores)[-10:][::-1]
            }
            if max(rouge_scores) > 0.7:
                continue
            else:
                keep += 1
            instruction_data_entry["most_similar_instructions"] = most_similar_instructions
            instruction_data_entry["avg_similarity_score"] = float(np.mean(rouge_scores))
            machine_instruction_data.append(instruction_data_entry)
            all_instructions.append(instruction_data_entry["instruction"])
            all_instruction_tokens.append(new_instruction_tokens)
            progress_bar.update(1)
        process_duration = time.time() - process_start
        print(f"Request {request_idx} took {request_duration:.2f}s, processing took {process_duration:.2f}s")
        print(f"Generated {total} instructions, kept {keep} instructions")
        utils.jdump(machine_instruction_data, os.path.join(output_dir, "regen.json"))
위의 코드는 결과에서 추출된 지시사항들을 처리하고 유사도를 계산하는 부분입니다.
처음에는 빈 리스트인 `instruction_data`를 선언합니다. 그런 다음, `results`에 있는 각 결과에 대해 `post_process_gpt3_response` 함수를 사용하여 유효한 지시사항들을 추출하고, `new_instructions`에 저장합니다. 그리고 `instruction_data`에 `new_instructions`를 추가합니다.
다음으로, 전체 지시사항 개수를 `total`에 저장하고, 유사도를 계산하기 위해 루프를 실행합니다. 각 지시사항을 순회하면서, 먼저 해당 지시사항을 토큰화한 후 미리 토큰화된 지시사항들과의 유사도를 계산합니다. 이때, 병렬처리를 위해 `Pool`을 사용하여 계산을 수행합니다.
유사도 계산이 완료되면, 가장 유사한 지시사항들을 `most_similar_instructions`에 저장합니다. 만약 가장 높은 유사도 점수가 0.7보다 크다면 (코드 197번째 줄의
if max(rouge_scores) > 0.7:) 해당 지시사항은 유사한 지시사항이 이미 존재하므로 제거합니다. 그렇지 않으면, `keep` 변수를 증가시키고, 해당 지시사항의 유사한 지시사항들과 평균 유사도 점수를 추가로 저장합니다. 그리고 `machine_instruction_data`, `all_instructions`, `all_instruction_tokens`에 해당 지시사항과 관련된 정보를 추가합니다.
마지막으로, 처리 시간과 결과에 대한 정보를 출력하고, `machine_instruction_data`를 JSON 파일로 저장합니다.
이 코드는 추출된 지시사항들을 처리하고, 유사도를 계산하여 유사한 지시사항들을 필터링하는 과정을 수행합니다. 이를 통해 최종적으로 사용할 목적에 적합한 지시사항들을 얻을 수 있습니다.
전체 코드
def generate_instruction_following_data(
    output_dir="./",
    seed_tasks_path="./seed_tasks.jsonl",
    num_instructions_to_generate=100,
    model_name="text-davinci-003",
    num_prompt_instructions=3,
    request_batch_size=5,
    temperature=1.0,
    top_p=1.0,
    num_cpus=16,
):
    #seed instruction 데이터 가져오고
    seed_tasks = [json.loads(l) for l in open(seed_tasks_path, "r")]
    seed_instruction_data = [
        {"instruction": t["instruction"], "input": t["instances"][0]["input"], "output": t["instances"][0]["output"]}
        for t in seed_tasks
    ]
    print(f"Loaded {len(seed_instruction_data)} human-written seed instructions")

    os.makedirs(output_dir, exist_ok=True)
    request_idx = 0
    # load the LM-generated instructions
    machine_instruction_data = []
    if os.path.exists(os.path.join(output_dir, "regen.json")):
        machine_instruction_data = utils.jload(os.path.join(output_dir, "regen.json"))
        print(f"Loaded {len(machine_instruction_data)} machine-generated instructions")

    # similarities = {}
    scorer = rouge_scorer.RougeScorer(["rougeL"], use_stemmer=False)

    # now let's generate new instructions!
    progress_bar = tqdm.tqdm(total=num_instructions_to_generate)
    if machine_instruction_data:
        progress_bar.update(len(machine_instruction_data))

    # first we tokenize all the seed instructions and generated machine instructions
    all_instructions = [d["instruction"] for d in seed_instruction_data] + [
        d["instruction"] for d in machine_instruction_data
    ]
    all_instruction_tokens = [scorer._tokenizer.tokenize(inst) for inst in all_instructions]

    while len(machine_instruction_data) < num_instructions_to_generate:
        request_idx += 1

        batch_inputs = []
        for _ in range(request_batch_size):
            # only sampling from the seed tasks
            prompt_instructions = random.sample(seed_instruction_data, num_prompt_instructions)
            prompt = encode_prompt(prompt_instructions)
            batch_inputs.append(prompt)
        decoding_args = utils.OpenAIDecodingArguments(
            temperature=temperature,
            n=1,
            max_tokens=3072,  # hard-code to maximize the length. the requests will be automatically adjusted
            top_p=top_p,
            stop=["\n20", "20.", "20."],
        )
        request_start = time.time()
        results = utils.openai_completion(
            prompts=batch_inputs,
            model_name=model_name,
            batch_size=request_batch_size,
            decoding_args=decoding_args,
            logit_bias={"50256": -100},  # prevent the <|endoftext|> token from being generated
        )
        request_duration = time.time() - request_start

        process_start = time.time()
        instruction_data = []
        for result in results:
            new_instructions = post_process_gpt3_response(num_prompt_instructions, result)
            instruction_data += new_instructions

        total = len(instruction_data)
        keep = 0
        for instruction_data_entry in instruction_data:
            # computing similarity with the pre-tokenzied instructions
            new_instruction_tokens = scorer._tokenizer.tokenize(instruction_data_entry["instruction"])
            with Pool(num_cpus) as p:
                rouge_scores = p.map(
                    partial(rouge_scorer._score_lcs, new_instruction_tokens),
                    all_instruction_tokens,
                )
            rouge_scores = [score.fmeasure for score in rouge_scores]
            most_similar_instructions = {
                all_instructions[i]: rouge_scores[i] for i in np.argsort(rouge_scores)[-10:][::-1]
            }
            if max(rouge_scores) > 0.7:
                continue
            else:
                keep += 1
            instruction_data_entry["most_similar_instructions"] = most_similar_instructions
            instruction_data_entry["avg_similarity_score"] = float(np.mean(rouge_scores))
            machine_instruction_data.append(instruction_data_entry)
            all_instructions.append(instruction_data_entry["instruction"])
            all_instruction_tokens.append(new_instruction_tokens)
            progress_bar.update(1)
        process_duration = time.time() - process_start
        print(f"Request {request_idx} took {request_duration:.2f}s, processing took {process_duration:.2f}s")
        print(f"Generated {total} instructions, kept {keep} instructions")
        utils.jdump(machine_instruction_data, os.path.join(output_dir, "regen.json"))